Inserting Images
To insert images onto your page, you will use the Content Box. You can either Edit an existing content box by clicking the Pencil button, or you can create a new content box by going to the Add Content menu and clicking Content Box.
In the Body Section of the edit window, there is an icon that looks like a picture of a tree.
This is the Insert/Edit Image button. When you click on the Insert/Edit Image button, all the fields will be blank since you have not inserted a picture yet.
Instead of uploading an image directly to a Content Box, the Content Management System is designed with an Image Manager, where you can manage all the images of your site in one location.

Then you will choose from your Image Manager which of your images you would like to insert into this particular Content Box. To access your Image Manager, click on the browse button to the right of the Image URL field.
On the left side of the window are your Categories and Folders. The Uploads folder (1) is the Root folder, or Base folder, which contains all the subfolders. To create a new subfolder, click the Create Folder button (2) at the top right. To upload new images to the Image Manager, click the Upload button (3), then browse to the image that you would like to add. NOTE: Image must be smaller than 1 MB in size, and may not contain spaces or punctuation.
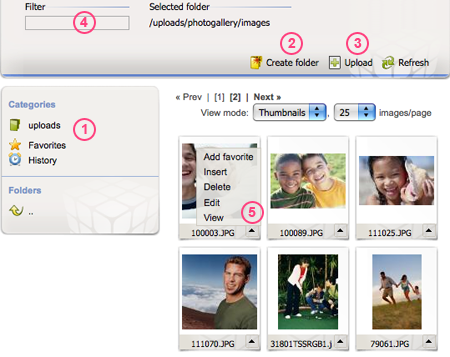
You can also search your folders for a particular image by using the Filter feature (4).
Below each thumbnail is the title and an arrow to the right (5). This will give you additional options regarding that particular image. Add Favorite will add that image to your favorites folder. Insert will insert the image into the content box that you currently have open. Delete will delete this image off of the server. (Keep in mind that if the image is currently being used in a Content Box and you delete it from the Image Manager, the webpage will now show an empty box with a broken image icon rather than the image.) Edit will open an image editor that allows you to crop, resize, and save the image. View will show you the true/full size of the image as well as list the properties of the image.
Again, clicking Insert will place that image into your content box, but you can also simply click on the image. This will close you out of your Image Manager and bring you back to the Insert/Edit Image window. Now the selected image will be listed in the Image URL field.
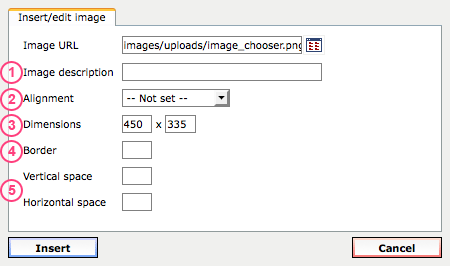
Entering an Image Description (1) will cause a textbox to appear when you hover the mouse over the image. The Alignment (2) is how the image aligns with the text. Manipulating the Dimensions (3) will resize the image as it displays on the webpage without changing the file on the server. Note: this will not constrain the proportions. The Border (4) simply puts a black border around the image, so enter the width in pixels you would like it to be. The Vertical Space and Horizontal Space (5) refer to the amount of pixel space or cusion between the image and the text. When it is blank, it defaults to be 4 pixels. If you would like to increase that, simply type a larger number in the space provided. Click Insert to place this image in the body of your body editor.
You can click on the image to select it and drag the corners to resize it. You can also drag the image to another place within the text. (NOTE: The image will not always go exactly where you drag it to depending on which alignment you chose.) To make the image a link, select the image and click the Link button in the body editor, just like you would for text. To go back to the image properties, select the image and click on the Insert/Edit Image button (tree). To insert additional image, click the Insert/Edit Image button, making sure that the first image is not selected.
When finished, click save.
subpages
- Advanced Security
- Anchors
- Blogging
- Calendar
- Contact Management
- Domain Transfers
- E-commerce
- Email Marketing
- Embedding Videos
- Event Box
- Flash Event Box
- Flash Photo Gallery
- File Box
- Forms
- Go Live
- Image Manager
- Image Verification
- Multimedia Box
- Page Layout/Properties
- Pages
- Podcasting
- SEO Basics
- Sorting Content
- Social Media
- Sub Page Box
- Troubleshooting
- Website statistics
- WYSIWYG FAQs
- Video Standards
- Walkthrough
