Email Scheduler
The Email Scheduler allows you to schedule a specific time to send out an email without having to be at a computer when it is sent. Also, because of the browser limitations on the Mass Email, the Email Scheduler is designed to be able to send to as many as 5,000 contacts at a time.
 Scheduling an Email
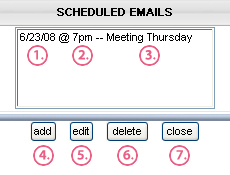
To send an email using the Email Scheduler, go to Site Management > Email Marketing > Email Scheduler. This will bring up the list of emails that have been saved, shown at right. In the list will be the Date that the email is scheduled to be sent (1), the Time of day it will be sent (2), and the Suject header of the email (3). To schedule an email, click Add (4). To modify an existing scheduled email, click Edit (5). To cancel a scheduled email, click Delete (6). To exit this screen, click Close (7).
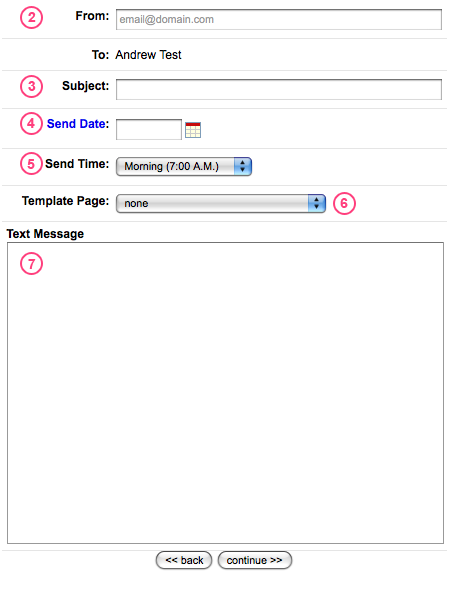
When Adding a new email (shown below), you will first select the group to send to (1). In the From space (2) type the email address that you want to appear in the from portion of the email. Subject (3) refers to the subject header of the email.
You have the option of typing in the Send Date (4) in the format mm/dd/yyyy, or you can click on Send Date and choose the date from a calendar.

The Use E-Mail Template Page option (6) will only be available for websites with a Dynamic Email. The Dynamic Email is standard for Custom and Church Fusion websites, and is an upgrade for Ministry Fussion, Youth Fusion, and Children Fusion. If you have the Dynamic Email, you will have the option to chose it to be sent as the scheduled email (6). If you have multiple Dynamic Emails to choose from, those will all appear here. Otherwise the only options will be Select One or Dynamic Email. You also have the option of sending a plain text email by leaving the Template Page option blank and typing in the box provided (7).
If you do not have the Dynamic Email, simply type the email in the box provided (7) then click Save.
